Apache Virtual Hosts
This serves as a sort of dump for useful things I’ve learned about configuring Apache.
Apache in Debian vs other distros.
Apache configuration is laid out differently when installed in Debian than other Linux distros. This also varies from the documentation. However, it’s not too bad to get used to it. Seems like the configuration is just more spread out over multiple folders. Look in the root /etc/apache2 for configuration.
The rest of this post is written for a Debian installation.
Folder structure
-
/etc/apache2- Default root Apache configuration folder in Debian installs-
/apache2.conf- This is the main configuration file. Apache configuration starts here, and then you’ll see that this file includes files in the other directories in order to pull in further configuration. You won’t usually want to edit this file- you’ll edit the files in the other folders. - Notice the pattern of
availableandenabledfolders. (e.g.conf-available/conf-enabled). This pattern is used for theconf,mods, andsitesfolders. It’s a way of using the file system to manage configuration that is active or not. More explicitly:- Say I add
mysite.confinsites-available- this initially does nothing. I need to “enable” the configuration for it to even to read on startup. - I could run
sudo a2ensite ymysite.conf- all this actually does is create a symbolic link in/sites-enabled/to this file- somysite.confnow also shows up insites-enabled, and next time I restart Apache these setting take effect. Likewisea2dissitesimply removes the symbolic link.
- Say I add
-
The folder structure is used to organize the configuration. You can have more than one configuration enabled at a time- remember that all the active configuration are is just files in /etc/apache2/*-enabled that are included by the default /etc/apache2/apache2.conf. You can see this at the end of apache2.conf:
# [...]

# Include generic snippets of statements
IncludeOptional conf-enabled/*.conf

# Include the virtual host configurations:
IncludeOptional sites-enabled/*.conf

ServerName 127.0.0.1
Configuring using Virtual Hosts
Virtual hosts is a powerful Apache feature you can use to configure hosting on your Apache server. Using Virtual hosts, you can configure things such as URL rewriting, multiple domains, domain forwarding, etc. Below are some examples:
Configuring initial site.
If you look in /etc/apache2/sites-available you’ll see there’s a default 000-default.conf that is pretty vanilla:
<VirtualHost *:80>
  # The ServerName directive sets the request scheme, hostname and port that
  # the server uses to identify itself. This is used when creating
  # redirection URLs. In the context of virtual hosts, the ServerName
  # specifies what hostname must appear in the request's Host: header to
  # match this virtual host. For the default virtual host (this file) this
  # value is not decisive as it is used as a last resort host regardless.
  # However, you must set it for any further virtual host explicitly.
  #ServerName www.example.com

  ServerAdmin webmaster@localhost
  DocumentRoot /var/www/html

  # Available loglevels: trace8, ..., trace1, debug, info, notice, warn,
  # error, crit, alert, emerg.
  # It is also possible to configure the loglevel for particular
  # modules, e.g.
  #LogLevel info ssl:warn

  ErrorLog ${APACHE_LOG_DIR}/error.log
  CustomLog ${APACHE_LOG_DIR}/access.log combined

  # For most configuration files from conf-available/, which are
  # enabled or disabled at a global level, it is possible to
  # include a line for only one particular virtual host. For example the
  # following line enables the CGI configuration for this host only
  # after it has been globally disabled with "a2disconf".
  #Include conf-available/serve-cgi-bin.conf
</VirtualHost>
We can write our own simple one with our domain. This is an example of the one I wrote when experimenting with using Kirby to host my blog (which I ended not using). pabloaizpiri-kirby-blog.conf:
<VirtualHost *:80>
  # The ServerName directive sets the request scheme, hostname and port that
  # the server uses to identify itself. This is used when creating
  # redirection URLs. In the context of virtual hosts, the ServerName
  # specifies what hostname must appear in the request's Host: header to
  # match this virtual host. For the default virtual host (this file) this
  # value is not decisive as it is used as a last resort host regardless.
  # However, you must set it for any further virtual host explicitly.
  #ServerName www.example.com

  ServerAdmin webmaster@localhost
  DocumentRoot /var/www/html/pabloaizpiri-blog-kirby/
  ServerName pabloaizpiri.com
  ServerAlias www.pabloaizpiri.com

  <Directory /var/www/html/pabloaizpiri-blog-kirby/>
    Options FollowSymlinks
    AllowOverride All
    Require all granted

    RewriteEngine on
    RewriteBase /
    RewriteCond %{REQUEST_FILENAME} !-f
    RewriteCond %{REQUEST_FILENAME} !-d
    RewriteRule ^panel/(.*) panel/index.php [L]
  </Directory>

  # Available loglevels: trace8, ..., trace1, debug, info, notice, warn,
  # error, crit, alert, emerg.
  # It is also possible to configure the loglevel for particular
  # modules, e.g.
  #LogLevel info ssl:warn

  ErrorLog ${APACHE_LOG_DIR}/error.log
  CustomLog ${APACHE_LOG_DIR}/access.log combined

  # For most configuration files from conf-available/, which are
  # enabled or disabled at a global level, it is possible to
  # include a line for only one particular virtual host. For example the
  # following line enables the CGI configuration for this host only
  # after it has been globally disabled with "a2disconf".
  #Include conf-available/serve-cgi-bin.conf
</VirtualHost>
Enabling Configuration
In this case, we could disable the default configuration, and enable this one. I would create the pabloaizpiri-kirby-blog.conf file in /etc/apache2/sites-available/ with the above configuration. Then I can disable the default configuration and enable this one:
-
sudo a2dissite 000-default(disable the default virtual host) -
sudo a2ensite your-domain.conf(enable our virtual host) -
sudo apache2ctl configtest(you can use this command to test the syntax is valid) -
sudo systemctl restart apache2.service(restart Apache2)
Note that in this case I’m using the rewrite mod, so I’d need to enable that too: sudo a2enmod rewrite
Other Configuration Examples
Another example is using Apache to host multiple sites from multiple domains. You could have a .conf file for each domain in the /etc/apache2/sites-available and /etc/apache2/sites-enabled:
first-domain.conf:
<VirtualHost *:80>
  DocumentRoot "/var/www/html/first-domain/"
  ServerName www.first-domain.com
  AliasName first-domain.com *first-domain.com
</VirtualHost>
second-domain.conf:
<VirtualHost *:80>
  DocumentRoot "/var/www/html/second-domain/"
  ServerName www.second-domain.com
  AliasName second-domain.com *second-domain.com
</VirtualHost>
One thing to note the asterisk in the <VirtualHost *:80> tag match all addresses for port 80, if you have multiple matched for the same domain, the first one listed will take priority. In the case of multiple files, I’ve found this means the first file alphabetically will take precedence.
You might also need to redirect from HTTPS to HTTP or vice versa:
<VirtualHost *:80>
  DocumentRoot "/var/www/html/first-domain/"
  ServerName www.first-domain.com
  AliasName first-domain.com *first-domain.com
</VirtualHost>

<VirtualHost *:443>
  ServerName www.first-domain.com
  AliasName first-domain.com *first-domain.com
  Redirect / http://www.first-domain.com/
</VirtualHost>
Additionally, we need to have configured Apache to serve on ports we want. However, 80/443 is already configured by default (see /etc/apache2/ports.conf which again, is included in apache2.conf)
Testing configuration:
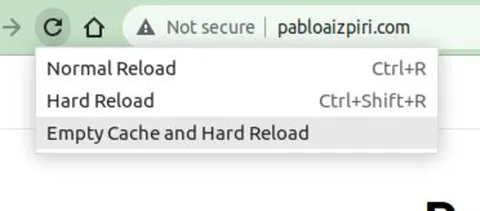
You can use system reload apache2 or sudo systemctl restart apache2.service to reload changes to take effect- however I notice browser caching can really mess up your testing! I recommend making sure you do a hard refresh.
In Google Chrome, I found the best way to do this was to open the developer console (F12), and the Ctrl + Right-click the reload button on the page. You’ll see a “Empty Cache and Hard Reload” button which is quite useful!
Helpful References
Enjoy Reading This Article?
Here are some more articles you might like to read next: